With the wheelwells finally in place I can start to prepare all the fiddly corners & edged on both the body shell and the new quarter panels to enable them to fit together correctly.
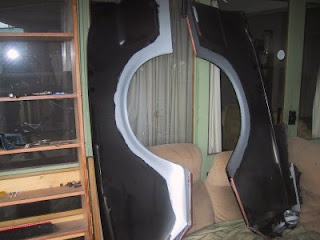
Here is a shot of the rear end after a dummy assembly to see how all the new pieces come together - almost gives enough incentive to continue!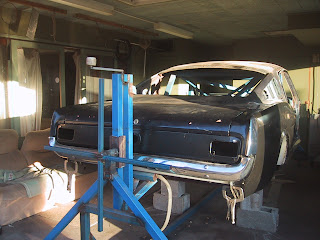
And no, that old couch next to the car is not my bed after the wife kicked me out for spending so much time on the car.....
I've used the method shown in the Mustang Monthly "How To" section under the heading "Quarter Panel Repairs" as my guide on how to do this. Basically, I am spot/plug welding the rear quarters along the front, rear & lower edges - while butt welding the top edge all the way from front to back (back to where the new quarter panel cuts in and joins the trunk drip rail).
However, as both aftermarket quarter panels are not a perfect fit, there is a HEAP of work involved in making sure everything lines up properly from a measurement and aesthetic perspective. This is a warning not to expect a good fit initially!
While the chassis construction was a "build to specification" job by constructing everything according the original engineering drawings, positioning the rear panels is more of an art. There are simply no dimensional measurements I can find that state exactly where (for example) the top outside edge of the rear quarter should be, how high the top edge of the tail panel should be, etc!
A BIG assumption I've made to guide me to where the rear quarter & tail panels should be (an assumption I had to make actually) is that the original trunk lid is very straight and undamaged. If this is true then I figure that if I re-fit the trunk lid to the body shell as perfectly as possible along its upper front edge - then I will have a good guide for positioning the rear quarters to give me the correct panel gaps along the trunk sides (as well as a guide for panel contour, height, length, etc). This is where many many many trail assemblies come in handy as well as an eye for what "looks right".
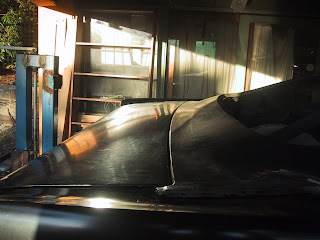
Here are some shots of various "dummy assemblies" to check panel fit. I had to reshape several edges to make them parallel with the trunk lid. Note that I have temporarily cut away some of my "space frame" and mounted the rear-end (nice & level) on blocks to refit the trunk lid.
I had to "unpick" spot-welds on (both) the rear quarters and reapply them properly to get the panel contours to match the profile of the top edge of the rear quarter extensions.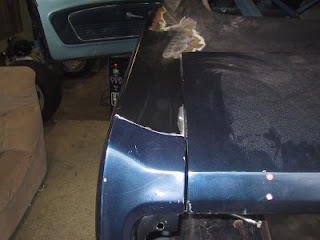
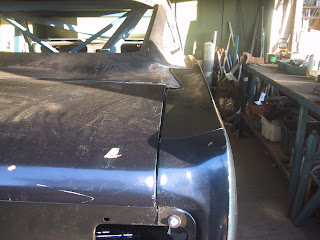
Notice the major panel gap mismatch between the right-hand trunk edge and the combo' of the rear quarter panel and extension. Lots of work needed to get this gap right!
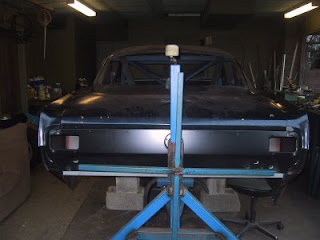
I also have a "fallback check" in place as I have once again set the bodyshell perfectly level (ie, it is rigidly mounted to the ground at the leaf-spring mounts and wont spin on the rotisserie). This means that no matter what I do on one quarter panel, I can compare its height and width with the other quarter panel to make sure they both end up the same. The following steps need to be done when replacing rear quarters......
Here is a shot of the rear end after a dummy assembly to see how all the new pieces come together - almost gives enough incentive to continue!

And no, that old couch next to the car is not my bed after the wife kicked me out for spending so much time on the car.....
I've used the method shown in the Mustang Monthly "How To" section under the heading "Quarter Panel Repairs" as my guide on how to do this. Basically, I am spot/plug welding the rear quarters along the front, rear & lower edges - while butt welding the top edge all the way from front to back (back to where the new quarter panel cuts in and joins the trunk drip rail).
However, as both aftermarket quarter panels are not a perfect fit, there is a HEAP of work involved in making sure everything lines up properly from a measurement and aesthetic perspective. This is a warning not to expect a good fit initially!
While the chassis construction was a "build to specification" job by constructing everything according the original engineering drawings, positioning the rear panels is more of an art. There are simply no dimensional measurements I can find that state exactly where (for example) the top outside edge of the rear quarter should be, how high the top edge of the tail panel should be, etc!
A BIG assumption I've made to guide me to where the rear quarter & tail panels should be (an assumption I had to make actually) is that the original trunk lid is very straight and undamaged. If this is true then I figure that if I re-fit the trunk lid to the body shell as perfectly as possible along its upper front edge - then I will have a good guide for positioning the rear quarters to give me the correct panel gaps along the trunk sides (as well as a guide for panel contour, height, length, etc). This is where many many many trail assemblies come in handy as well as an eye for what "looks right".
Here are some shots of various "dummy assemblies" to check panel fit. I had to reshape several edges to make them parallel with the trunk lid. Note that I have temporarily cut away some of my "space frame" and mounted the rear-end (nice & level) on blocks to refit the trunk lid.

I had to "unpick" spot-welds on (both) the rear quarters and reapply them properly to get the panel contours to match the profile of the top edge of the rear quarter extensions.

Notice the major panel gap mismatch between the right-hand trunk edge and the combo' of the rear quarter panel and extension. Lots of work needed to get this gap right!

I also have a "fallback check" in place as I have once again set the bodyshell perfectly level (ie, it is rigidly mounted to the ground at the leaf-spring mounts and wont spin on the rotisserie). This means that no matter what I do on one quarter panel, I can compare its height and width with the other quarter panel to make sure they both end up the same. The following steps need to be done when replacing rear quarters......
- Repair any rusted supporting panels that the new quarters attach to - to get the foundation right. I fabricated various custom patches for this. I found that the lower door-jams (just above the sills) had small areas that needed patching on both sides. Once patched, the internal faces of exposed metal were painted with Rust Bullet (while the external faces will of course get protected by body paint).
- Next I prepare any plug/spot-welding surfaces by removing the existing paint primer and replacing it with U-Pol weld-thru copper primer.
- Next I heated & removed the lead filler that was applied by Ford at the join of the trunk/roof/rear quarters. This is followed by some panel beating to straighten up any edges where I drilled out old spot welds.
- Next I refit the trunk lid and set the gaps as close to 3/16" as possible ensuring the trunk-lid height was flush with its adjoining front panel (the panel situated between the trunk and the bottom edge of the rear window).
- Now I could trial-fit the quarters to check/fix panel fit and required panel gaps.
- I also replaced the trunk "drop offs" as these were cheap to buy, easy to install and provided a perfect new surface to plug/spot weld the lower edges of the new quarters to.
- For better long-term rust protection I removed the temporary primer from the inside surface of the rear quarters along the lower edges and up over the wheel arch - and coated the bare metal with Rust Bullet.
- And lastly, I used my trusty measuring tape to make sure (first the chassis and then) both quarters were the same height (above level ground), width (for panel gap and from vehicle centre) & depth (flush with the rear face of the quarter extensions).
Below you can see the inside lower surfaces of the quarters better protected with Rust Bullet.
Notice (below) also that I deviated from OEM spec's along the bottom edge of the tail panel by grafting in some 2mm wall thickness 2" x 2" box tube. This tube solidly ties the rear frame rail together and provides a nice flat surface for spot welding my new tail panel to. The primary reason for the box tube at the rear though was to give the new large capacity stainless steel petrol tank a solid mounting point. The stainless tank is straight out of my old Ute and has a recess in it for fitting the battery (a recess for the battery just like current BMW sedans). This makes the tank/battery combo quite heavy and in need of solid mounting points. This design also keeps all significant rear weight items as low as possible to the ground.

Once the quarters were prepared I tack welded the top front edge as seen below. This makes sure the whole panel doesn't lift at this crucial spot (its right where the door closes and so the panels need to line up). I re-hung the doors as well - as a guide to make sure everything lined up and was a flush fit. In this photo you can see the initial tack welds that i put every 2 or 3" along the top edge of the new quarters in preparation for the final butt-weld. Thankfully, the new panel contour along the top edge was quite close to the original metal profile as can be seen here if you enlarge the photo. And yes, a final patch will need to put into the pillar!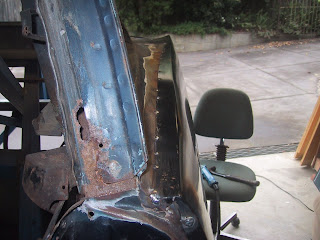
Here is a shot from the rear showing the plug & tack welds. I'm leaving the surrounding old paint and body-filler in place for now to stop surface rust....

And shown below is the other quarter after fully butt-welding the top edge and then smoothed off with the grinder (using a sanding disk). Everything lines up nicely!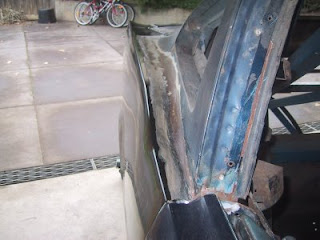
With the quarters in place it was time for the tail panel and associated trunk drain channels on the outer edges. I couldn't get my hands on the trunk drain channel corners for a Fastback so I used both the original pieces I cut out and a set of new coupe trunk "drain corners" to fashion new ones - just another few hours of custom fabrication... ho hum.
One thing I did find was that my trunk lid was slightly warped by about 5mm from one rear corner to the other, and, that the final shape of the trunk itself (when shut) is affected by the existence of the rubber seal or not. I had to re-attach segments of the rubber seal to get my final contours right. Lesson - don't remove the rubber seal if going down the path that I did.
Other than that, I had to adjust the section of the rear quarters (where the extensions bolt on) to get the tail panel to sit parallel with the ground. One side was "formed" higher than the other - which is what you can expect with these aftermarket items. As the tail panel was a simple flat sheet of steel (and nice and "square" when measured), it was clear that the back of the rear quarters were the problem.
And here is the result (but not a good exposure I must admit). I've temporarily sprayed any exposed metal with black epoxy primer to prevent rust. Mmmm, maybe a matt-black Fastback would look ok!?

Notice (below) also that I deviated from OEM spec's along the bottom edge of the tail panel by grafting in some 2mm wall thickness 2" x 2" box tube. This tube solidly ties the rear frame rail together and provides a nice flat surface for spot welding my new tail panel to. The primary reason for the box tube at the rear though was to give the new large capacity stainless steel petrol tank a solid mounting point. The stainless tank is straight out of my old Ute and has a recess in it for fitting the battery (a recess for the battery just like current BMW sedans). This makes the tank/battery combo quite heavy and in need of solid mounting points. This design also keeps all significant rear weight items as low as possible to the ground.

Once the quarters were prepared I tack welded the top front edge as seen below. This makes sure the whole panel doesn't lift at this crucial spot (its right where the door closes and so the panels need to line up). I re-hung the doors as well - as a guide to make sure everything lined up and was a flush fit. In this photo you can see the initial tack welds that i put every 2 or 3" along the top edge of the new quarters in preparation for the final butt-weld. Thankfully, the new panel contour along the top edge was quite close to the original metal profile as can be seen here if you enlarge the photo. And yes, a final patch will need to put into the pillar!

Here is a shot from the rear showing the plug & tack welds. I'm leaving the surrounding old paint and body-filler in place for now to stop surface rust....

And shown below is the other quarter after fully butt-welding the top edge and then smoothed off with the grinder (using a sanding disk). Everything lines up nicely!

With the quarters in place it was time for the tail panel and associated trunk drain channels on the outer edges. I couldn't get my hands on the trunk drain channel corners for a Fastback so I used both the original pieces I cut out and a set of new coupe trunk "drain corners" to fashion new ones - just another few hours of custom fabrication... ho hum.
One thing I did find was that my trunk lid was slightly warped by about 5mm from one rear corner to the other, and, that the final shape of the trunk itself (when shut) is affected by the existence of the rubber seal or not. I had to re-attach segments of the rubber seal to get my final contours right. Lesson - don't remove the rubber seal if going down the path that I did.
Other than that, I had to adjust the section of the rear quarters (where the extensions bolt on) to get the tail panel to sit parallel with the ground. One side was "formed" higher than the other - which is what you can expect with these aftermarket items. As the tail panel was a simple flat sheet of steel (and nice and "square" when measured), it was clear that the back of the rear quarters were the problem.
And here is the result (but not a good exposure I must admit). I've temporarily sprayed any exposed metal with black epoxy primer to prevent rust. Mmmm, maybe a matt-black Fastback would look ok!?
