The photo below shows how things look from underneath. While it's easy to spot the sub-frame connectors, keen eyes will spot the box chassis running in the sills and keener eyes will see the front-seat mounting rails as they attach to the sills on the outer edges of the floor (and are cut into the floor-pan at the outer edges).

This photo of inside the cabin shows the custom seat mounting rails (50mm x 50mm box-tube) in position across the floor, including the hump over the trans-tunnel. With these seat rails welded to the sub-frame connectors and the outer sill chassis, I have a very rigid structure setup for the car. The good thing is that it all sits low in the vehicle ensuring any extra weight is as low to the ground as possible.

While the underneath of the car is simply painted in an epoxy to protect it from surface rust (until I work out exactly how I will paint the entire car), the inside of the cabin has been hit with POR-15 to seal it from moisture. I'm only luke-warm with the gloss-black finish it has, but water certainly "beads" on it immediately and drains right away.
The photo below shows the firewall in a semi-finished state. I'm yet to panel-beat & grind it completely smooth, but you get an idea of the shape that was required to sit the engine back as far as possible. The recess for the Trickflow head on the right of picture is about an inch deep.

Note that I've made a custom frame-rail that used to be in place where the rear engine mount bolted on. I've put this piece back in the same location in case a small-block is ever re-installed in the car, but it is extended upwards by about 2 inches to cater for the trans-tunnel being raised by this amount to fit the big-block/tremec driveline combination.

Note that I've made a custom frame-rail that used to be in place where the rear engine mount bolted on. I've put this piece back in the same location in case a small-block is ever re-installed in the car, but it is extended upwards by about 2 inches to cater for the trans-tunnel being raised by this amount to fit the big-block/tremec driveline combination.
Just for some added detail, note how Ive applied liberal amounts of Rust Bullet to the draining areas of the lower cowl (where the draining hole are cut into the new bracing i've added). Once I finish the lower cowl surface off with POR-15, I'd be very suprised if this area ever rusted thru to leak into the cabin again!

From this point on, the rest of this post is the same - showing the lead-up to completing things above. I am ready now for my first vehicle inspection from an engineer that works with the state traffic authorities. That person will deem this chassis safe (or show me where to fix things) so I can move on to final panel & bodywork items (to fix) in preparation for paint and assembly.

From this point on, the rest of this post is the same - showing the lead-up to completing things above. I am ready now for my first vehicle inspection from an engineer that works with the state traffic authorities. That person will deem this chassis safe (or show me where to fix things) so I can move on to final panel & bodywork items (to fix) in preparation for paint and assembly.
All that will be in a new set of posts......
BTW - if anyone has a suggestion for the color for this car then sent me a message!
Previous post info.............
Previous post info.............
The floors & sub-frame connectors have proven to be such a beast, probably because of all the custom work I've done in fitting the big-block and squeezing the full chassis within the sills.
Then again, I also went for a custom sub-frame that's cut into the floor to give me "near stock" ground clearance under the car. I nearly didn't put in the sub-frames, but with the chassis not being a suitable spot to run my battery leads, fuel lines, Cat6 Ethernet & wiring harness - they have become the best way to both strengthen the car further as well as hide & protect the above items.
The following photos show the basic approach I've taken.......
First I manufactured the sub-frames that tie the front & rear frames together.

Getting the angles right on these was "fiddly" as I wanted to ensure it was as easy as possible to push the conduit & fuel lines through.
Next I lay the floor pans in position to mark out and then cut out the slots to allow the new sub-frames to push up into both floors as the floor pans themselves were lowered into position.
Once happy after a few last moment passes with the grinder ("flapper" disks are fantastic tool I've discovered!) to get a perfect custom fit, I clamped and then welded the floors to the front frame-extensions (via plug welds), the connectors and the rear floor (under the rear seat). Oh - and of course you can see the copper "weld thru" primer on the parts that will get covered up as well as the custom "humps" I had to include in the floor pans to clear the custom rear transmission mount. It all takes time...........

You can see the way they are nicely "cut in" to the floor. At their lowest point on the car, they protrude 1" into the cabin and 1" below the floor.

You can see the way it all finished up nicely in the photo below - even before I've finally welded the floors all along their inner edges (to the trans-tunnel) and outer edges (to the inner sill panels).
Then again, I also went for a custom sub-frame that's cut into the floor to give me "near stock" ground clearance under the car. I nearly didn't put in the sub-frames, but with the chassis not being a suitable spot to run my battery leads, fuel lines, Cat6 Ethernet & wiring harness - they have become the best way to both strengthen the car further as well as hide & protect the above items.
The following photos show the basic approach I've taken.......
First I manufactured the sub-frames that tie the front & rear frames together.

Getting the angles right on these was "fiddly" as I wanted to ensure it was as easy as possible to push the conduit & fuel lines through.
Next I lay the floor pans in position to mark out and then cut out the slots to allow the new sub-frames to push up into both floors as the floor pans themselves were lowered into position.

Once happy after a few last moment passes with the grinder ("flapper" disks are fantastic tool I've discovered!) to get a perfect custom fit, I clamped and then welded the floors to the front frame-extensions (via plug welds), the connectors and the rear floor (under the rear seat). Oh - and of course you can see the copper "weld thru" primer on the parts that will get covered up as well as the custom "humps" I had to include in the floor pans to clear the custom rear transmission mount. It all takes time...........

You can see the way they are nicely "cut in" to the floor. At their lowest point on the car, they protrude 1" into the cabin and 1" below the floor.

You can see the way it all finished up nicely in the photo below - even before I've finally welded the floors all along their inner edges (to the trans-tunnel) and outer edges (to the inner sill panels).

In the following shots the trans-tunnel is finally welded to the floor and I've created the recesses needed for the rear gearbox mount - but allowing it to mount forward or rearward a few inches to optimise the final engine location.


Now you can see my firewall templates being installed. I had originally created a single steel sheet (after making a cardboard template) but had to split it into two sections just so I could handle it properly and get the best final fit. You can see where I've marked it to make various recesses for the heads, for the "bend-lines" to start the transition to the trans-tunnel, etc.


And here is the firewall in place, but waiting for the recesses to be cut & welded in to cater for the offset of the heads on one side of the engine-block (American drivers side) as well as the pedal-box & steering wheel mounting plate on the other side.

As you can see below, I've plug-welded the new firewall on its edges, but seam-welded it to the new floor panels and up along the full length of its top edge (where it welds to the firewall/shock-tower brace).

The photo below shows the car spun on its side so you can see the seam weld along the firewalls top edge.

It was great to finally receive my under dash brake booster from RRS. This unit includes the clutch pedal assembly too - so all hydraulics except the remote reservoirs are concealed. While this really cleans up the engine bay, I've had to do this anyway so the big-block will fit. The quality of the unit is first-class and it bolted right in with very little problem.
The photo below shows things close to complete. I've grafted the firewall section from the original firewall in place to allow the RRS under dash pedal-box to bolt in. You will also notice the notched cross-brace and recess in progress. And lastly, it was great to bolt the steering wheel & column back in - as that makes it start to look like a real car again. You can see I did a trial fit that included the steering rack to ensure no binding in the universal joints would occur.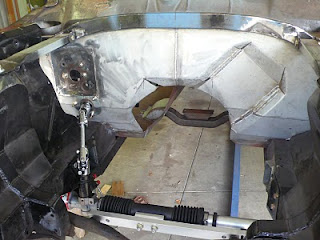
In terms of strength, the shell will be quite rigid I'm sure. No doubt I'll "pay" for that however with a harsher ride, but that's a small price in my opinion. Something I will need to keep an eye on now though is the front pillars (where they join the cowl and roof) - as this would be my logical weak spot(s) and thus a place to flex and cause paint cracking. More on what I'm doing to mitigate that potential problem in another post though.....

The photo below shows things close to complete. I've grafted the firewall section from the original firewall in place to allow the RRS under dash pedal-box to bolt in. You will also notice the notched cross-brace and recess in progress. And lastly, it was great to bolt the steering wheel & column back in - as that makes it start to look like a real car again. You can see I did a trial fit that included the steering rack to ensure no binding in the universal joints would occur.

In terms of strength, the shell will be quite rigid I'm sure. No doubt I'll "pay" for that however with a harsher ride, but that's a small price in my opinion. Something I will need to keep an eye on now though is the front pillars (where they join the cowl and roof) - as this would be my logical weak spot(s) and thus a place to flex and cause paint cracking. More on what I'm doing to mitigate that potential problem in another post though.....