With the full chassis now installed I can cut back on the existing space-frame to free up room to install the floor. I can also now drop the front of the rotisserie back down on the garage floor - as I had chocked the front up on blocks to make the whole shell perfectly level and rigid (for accurate installation of the chassis). See the shot below of the various blocks used to lift the front of the car to a "factory level" position - just prior to chassis installation.
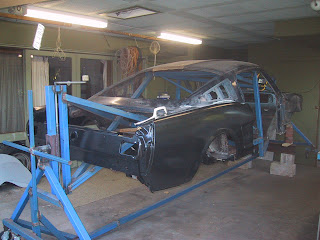
I used factory standard '65 Mustang chassis spec's I found on the Internet to get these measurements right. Something interesting I found with this car was that one side of the roofline (measured at the highest point of the driprail) was about three-quarters of an inch higher than the other side - even when all other frame and sill measurements down to the floor where the same (factory tolerances for 1966 maybe?)! This really surprised me as you just couldn't tell one side was higher than the other when looking at the car (looking at it either before or after dismantling). So I pulled the high-side of the roof down and made sure I corrected all critical body and frame measurements to within about +/- 1 millimeter of factory spec's.
But before the floor actually goes back in and makes it harder to access the whole body shell, I cut out the old rusted front frame extensions, repaired the areas on the front frame where the extensions attached and welded in the new extensions. Here is a sequence of shots showing the extensions being restored.....
Notice just how many spot welds are done at the factory to hold these extensions on! The shot immediately below shows the extension "stubs" that remained after cutting out the rusty floor - flared open by my cold-chisel after drilling out the spot welds and "enticed" them off.
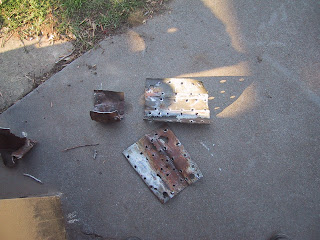
Now notice how much rust protection was done in this area (none!). I cut out the rusty portions of the frames and replaced the cut-outs with new metal.
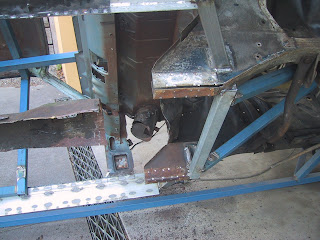
Because the frame-extensions are just a piece of stamped (channel shape) steel and are pushed up as a flush fit under the front frames, moisture gets trapped between the two surfaces around each spot weld. So I've painted the bottom surface of the front frame and the inner surface of the extension with "Rust Bullet". Then I pre-drilled the extensions for the new spot welds, trial-fitted them back on the frame and used a permanent marker to pinpoint where each hole is positioned on the front frame. I then ground away the coating of Rust Bullet at these marks to ensure i had clean metal to perform the spot weld (actually its a Mig weld that simulates a spot-weld by filling up the drill hole in the outer metal sheet). But before mig welding, I sprayed U-POL copper "weld-thru" primer onto each ground-back "spot". I don't think I can do any more to stop rust! The only risk I see is that there is Zinc (in the Rust Bullet paint), Copper (in the U-POL) and Iron in the steel frame - maybe electrolysis can start?..... But surely it's still better than bare metal as found from the factory! Here are the repaired front frames.
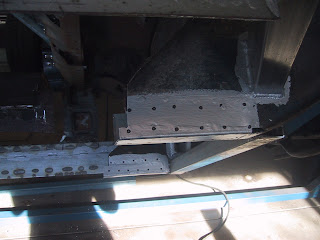
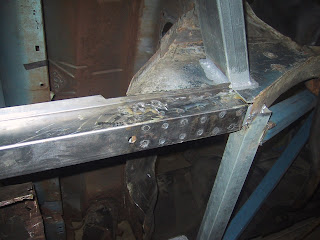
And now the new extensions with the inside surface protected with primer (after drilling the weld holes).
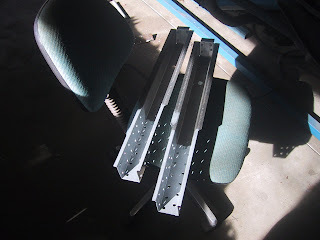
And here is some detail of the finished job. Very strong indeed.
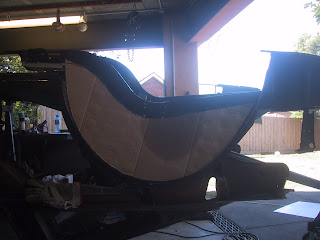
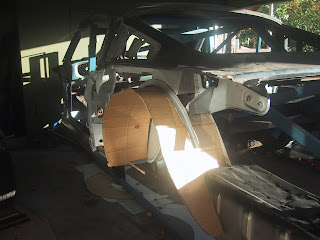
As for the rear wheelwells, I used sheets of cardboard to fashion templates for the 3 pieces used on each side (inner & outer walls as well as the wide strip that forms the "roof"). I was anticipating this was going to be a real pain but it was pretty straight-forward. I first created the inner wall template and used the "spine" that remained from the original wheelwell halves as my top contour and the rear frame-rail as my bottom contour - see picture below (sorry about the background glare).
I used the outer guard as my guide to fashion the outer walls and then cut out all the templates. I allowed an extra half-inch or so on each edge in case of error...
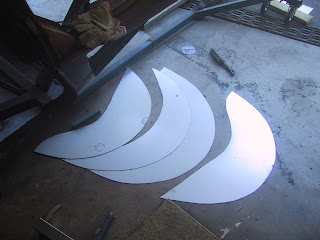
After the inner wall was tack-welded in place I once again trial fit the rear guard to fashion the roof section. As I want and original look for the car (no flared guards) the trick here is to give about only half an inch clearance from the outer edge of the roof section to where it would touch the inner surface of the rear guard. This was easy enough to do in iterations as I simply held a permanent marker pen flat against the inner skin of the rear guard and ran it along the edge of the cardboard template. After a few goes of trimming the cardboard back along the marker pen line, the tip of the marker pen no longer touched the edge of the cardboard anywhere when rolled along inside the panel - so job done!
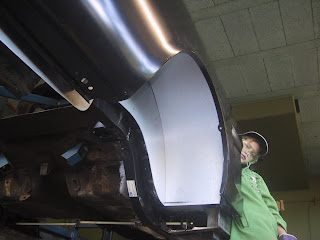
Next thing to do is cut the zinc-coated steel sheet as per the cardboard template and weld it in place. Looks ok in this shot below! I should mention that I took the liberty of moving the diff rebound stops from the outside (wheelwell side) of the rear frame-rail to the inner side. I also positioned the inner wall of the wheelwell inwards as far as possible - so the rear, inner edge of the wheelwell is right up flush against the vertical face of the rear frame rail. I got another inch of width in the wheelwells by doing this - nice (almost tubbed!).
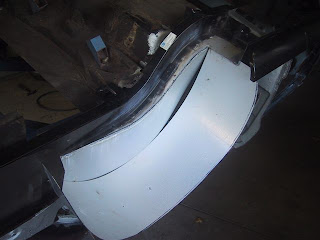
Notice below how the top edge of the inner wall warps once you've welded the (curved) bottom edge. This all straightens up though as you weld the top section on.
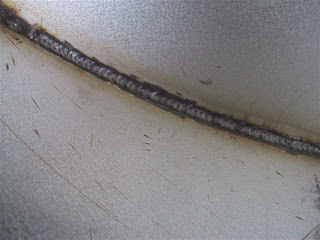
Now just a detail shot of the welds. The Mig does a great job as long as the zinc coating is ground back. There are no pin-holes evident at all. All these weld lines will be rust-proofed of course.
I used the old wheelwell spine and various inside panels to secure the new wheelwells. Some exposed welds look a little ugly now, but they will clean up nicely with a grind-back and primer (plus sound deadener).
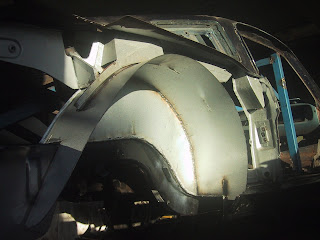
I had to be careful not to extend the new wheelwells too far into the cabin - otherwise I risked not being able to re-install my various interior trim panels. I also had to make sure I kept all mounting points for the interior trim and fold-back rear seat in their correct positions by welding various jig pieces onto the space-frame.
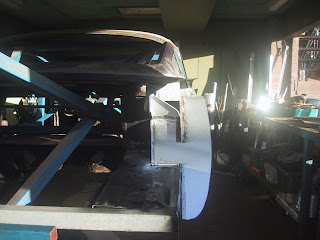
Once both wheelwells had their tops welded in, I re-attached the rear quarters to start the final fabrication of the tricky wheelwell outer walls. At first I cut another cardboard template to try and fabricate the outer wall and inward facing lip (that runs along the inner edge of rear guard that forms the wheel arch) as a single piece - but this proved way too hard. So I cut the lip off the outer wall and then hand-made the lip. I could then clamp the lip to the rear guard for a perfect fit and then tack weld it in place to the outer wheelwell wall before once again removing the rear guard and fully welding the outer wheelwell wall in place. Confused? If so, then hopefully the following pictures of the successful method illuminate things.....
I used factory standard '65 Mustang chassis spec's I found on the Internet to get these measurements right. Something interesting I found with this car was that one side of the roofline (measured at the highest point of the driprail) was about three-quarters of an inch higher than the other side - even when all other frame and sill measurements down to the floor where the same (factory tolerances for 1966 maybe?)! This really surprised me as you just couldn't tell one side was higher than the other when looking at the car (looking at it either before or after dismantling). So I pulled the high-side of the roof down and made sure I corrected all critical body and frame measurements to within about +/- 1 millimeter of factory spec's.
But before the floor actually goes back in and makes it harder to access the whole body shell, I cut out the old rusted front frame extensions, repaired the areas on the front frame where the extensions attached and welded in the new extensions. Here is a sequence of shots showing the extensions being restored.....
Notice just how many spot welds are done at the factory to hold these extensions on! The shot immediately below shows the extension "stubs" that remained after cutting out the rusty floor - flared open by my cold-chisel after drilling out the spot welds and "enticed" them off.
Now notice how much rust protection was done in this area (none!). I cut out the rusty portions of the frames and replaced the cut-outs with new metal.
Because the frame-extensions are just a piece of stamped (channel shape) steel and are pushed up as a flush fit under the front frames, moisture gets trapped between the two surfaces around each spot weld. So I've painted the bottom surface of the front frame and the inner surface of the extension with "Rust Bullet". Then I pre-drilled the extensions for the new spot welds, trial-fitted them back on the frame and used a permanent marker to pinpoint where each hole is positioned on the front frame. I then ground away the coating of Rust Bullet at these marks to ensure i had clean metal to perform the spot weld (actually its a Mig weld that simulates a spot-weld by filling up the drill hole in the outer metal sheet). But before mig welding, I sprayed U-POL copper "weld-thru" primer onto each ground-back "spot". I don't think I can do any more to stop rust! The only risk I see is that there is Zinc (in the Rust Bullet paint), Copper (in the U-POL) and Iron in the steel frame - maybe electrolysis can start?..... But surely it's still better than bare metal as found from the factory! Here are the repaired front frames.
And now the new extensions with the inside surface protected with primer (after drilling the weld holes).
And here is some detail of the finished job. Very strong indeed.
As for the rear wheelwells, I used sheets of cardboard to fashion templates for the 3 pieces used on each side (inner & outer walls as well as the wide strip that forms the "roof"). I was anticipating this was going to be a real pain but it was pretty straight-forward. I first created the inner wall template and used the "spine" that remained from the original wheelwell halves as my top contour and the rear frame-rail as my bottom contour - see picture below (sorry about the background glare).
I used the outer guard as my guide to fashion the outer walls and then cut out all the templates. I allowed an extra half-inch or so on each edge in case of error...
After the inner wall was tack-welded in place I once again trial fit the rear guard to fashion the roof section. As I want and original look for the car (no flared guards) the trick here is to give about only half an inch clearance from the outer edge of the roof section to where it would touch the inner surface of the rear guard. This was easy enough to do in iterations as I simply held a permanent marker pen flat against the inner skin of the rear guard and ran it along the edge of the cardboard template. After a few goes of trimming the cardboard back along the marker pen line, the tip of the marker pen no longer touched the edge of the cardboard anywhere when rolled along inside the panel - so job done!
Next thing to do is cut the zinc-coated steel sheet as per the cardboard template and weld it in place. Looks ok in this shot below! I should mention that I took the liberty of moving the diff rebound stops from the outside (wheelwell side) of the rear frame-rail to the inner side. I also positioned the inner wall of the wheelwell inwards as far as possible - so the rear, inner edge of the wheelwell is right up flush against the vertical face of the rear frame rail. I got another inch of width in the wheelwells by doing this - nice (almost tubbed!).
Notice below how the top edge of the inner wall warps once you've welded the (curved) bottom edge. This all straightens up though as you weld the top section on.
Now just a detail shot of the welds. The Mig does a great job as long as the zinc coating is ground back. There are no pin-holes evident at all. All these weld lines will be rust-proofed of course.
I used the old wheelwell spine and various inside panels to secure the new wheelwells. Some exposed welds look a little ugly now, but they will clean up nicely with a grind-back and primer (plus sound deadener).
I had to be careful not to extend the new wheelwells too far into the cabin - otherwise I risked not being able to re-install my various interior trim panels. I also had to make sure I kept all mounting points for the interior trim and fold-back rear seat in their correct positions by welding various jig pieces onto the space-frame.
Once both wheelwells had their tops welded in, I re-attached the rear quarters to start the final fabrication of the tricky wheelwell outer walls. At first I cut another cardboard template to try and fabricate the outer wall and inward facing lip (that runs along the inner edge of rear guard that forms the wheel arch) as a single piece - but this proved way too hard. So I cut the lip off the outer wall and then hand-made the lip. I could then clamp the lip to the rear guard for a perfect fit and then tack weld it in place to the outer wheelwell wall before once again removing the rear guard and fully welding the outer wheelwell wall in place. Confused? If so, then hopefully the following pictures of the successful method illuminate things.....
First I tack-welded the outer wheelwell wall to the roof and cut it's lower edge back carefully so that when the rear guard is fitted, the contour of the lower edge fits neatly along the guard lip. There is less than a half-inch gap as you can see below.
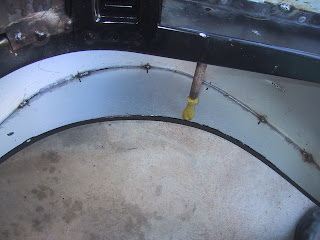
Next, use the guard lip to fashion a cardboard template that is then used to cut the metal strip that will become the wheelwell "lip". This shot shows the lip being initially bent over. Hammer & dolly work cleans this up later.
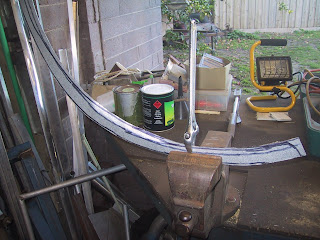
Now I clamp the new lip to the inside of the guard for a perfect fit and tack weld it on. Then I refit the guard (with its included lip in perfect position) and carefully locate the whole guard as if it was being fitted itself for the final time. I then tack-weld the flange of the new lip back onto the wheelwell outer wall (tack weld from inside the wheelwell).
To finish, I grind off the tackwelds that hold the lip to the rear guard - so I can once again remove the guard. This then gives me access to completely weld the lip to the wheelwell from the outside. All that's needed to complete the job is to grind back the welds and cover any exposed raw steel (inside & out) with rust-proof paint.
None of these welds will be visible once the guard is in place so it doesn't have to be pretty. It just needs to have solid welds and have no pin-holes for rust to start.