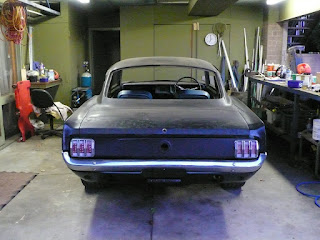
Here are some extra photos that may be of interest to some folk. Just some work-in-progress shots while I've been dummy-fitting various panels & suspension bits......
Now that the chassis modifications and frame have been "ok'd" by my vehicle engineer, it's time to perform final measurements on the overall frame itself and then test-fit the bolt-on panels in preparation for paint.
The photo above has the front qtr just "hanging" there while I check for front wheel room when steering "lock to lock". The rear suspension is just sitting at the standard suspension height - the car will be lower when complete.
This is a 16" rim that has an 8" width. The backspacing is....? I will put that on this blog once I measure it.....
The photo above shows I need to probably get another inch of backspace, obtain a lower control arm that has adjustable length, or flare the guard (which I wont do).
Now that the chassis modifications and frame have been "ok'd" by my vehicle engineer, it's time to perform final measurements on the overall frame itself and then test-fit the bolt-on panels in preparation for paint.
While I was very careful when measuring the frame during construction, you always get a bit of warping when spinning the body on the rotisserie and welding with the vehicle sitting at unusual angles.
So I have dropped the car back on its wheels and the following photos show what the panel-fit looks like without any final frame/chassis straightening.
I have the doors hung pretty close to where they will be in final assembly, but the guards are just bolted on loosely. I'm looking for straight, thin, consistent panel gaps of course! I've had to trim back some internal flanges on the front-guards already as they just don't fit properly "out of the box". You can also see the clear lenses and LED tail-lights installed so I can be sure all the add-ons will bolt up nicely and be aligned.
The areas that worry me are......
- the rear bumper (the rear right side just doesn't curl up at the outer edge as it should).
- the top-rear-inner edge of the guards (where they meet the windscreen pillar).
- the bonnet (front left edge) as I need more wiggle room for the front guards.
- the outer-rear trunk edges (where they meet the quarter extensions).
...while these areas "worry" me, it's all fixable - but will just need a lot of work to get it right!
Still - it's starting to look pretty good when "dummy fitted" together. Those rear wheels were made for a wider Australian falcon body but the offset looks good. This has given me a nice indication of what the rear axle length should be and so I'll be chopping back my 9" diff to be 1 inch shorter on each side.I will update this post with final pictures of the panels in place. Hopefully my '67 Shelby bonnet (fibreglass skin on metal frame) will be around by then....


